Showing posts with label Modification. Show all posts

Sunday, June 24, 2007

Taipei romp

Went around to CKS' place today and was looking at them doing the Cruise control modification for Toyota Wish. Total change of the wire harness. No mean feat here. No bad no expertise to do the same thing in Singapore. Otherwise, I'm sure people like Justin and Raymond sure go for it as they travel up to Kuala Lumpur every now and then.


Anyway, here is the 240 Aerosports style meter, but in the JDM high grade format. Nice! But not for me.


Oh. Seems like Hummer are getting popular here. I've already seen so many of them.


Cheers,

Thursday, May 31, 2007

Rear Air Vent?

Was wonder if there is any way to push the air con back to the rear section of the car without another compressor.

I know that we do have two vent at the bottom of the two front seats. Perhaps it's possible to add trunking and a blower/fan to pull the air through two of these ceiling vents.


This is what it looks like when open. 360 degrees directional control.


When closed, it's flushed with our ceiling panel


And this is what it might look like when properly modified. Obviously we only need 2. Also, the color is the same as our current fabric.

Original Toyota Part too. Now who got the balls to do it? Ah Lim has a spare roof fabric!

Cheers,

Saturday, May 05, 2007

Angel Eyes Ver 3.0

Raymond's installed the revised angel eyes on his ride!

These are also CCFL, but enclosed in a hollow acrylic tubing. Shelf life of CCFL is about 12 months. For continous and extended usage, it may be less. Here's some close up pictures.


Compared to all the other previous version, this one seems very well fitted. The smaller angel eye ring sits just outside of the lens holder, unlike the other once I saw earlier which sits inside the indent.


From the close up, we can see that for the fish eye len, the light is held in place by 3 clips. Since there is no internal reflector, I suppose this would be the best and most secured way. Notice the position of the ring creates another fish eye inside the projector lens!

Will try to get a day time picture one of these day for a better comparison.

Cheers,

Saturday, April 21, 2007

Metallic Blue Wish Emblems

Ok. We have the standard chrome and gold emblems, then we have the painted ones. After that, we had black/smoked chrome versions.

Now...metallic blue (or actually any color) chrome!!!


What will the Japanese think of next!

Actually, I think it looks quite nice. Perhaps for those with matching Endless brakes? From Yahoo Japan.

Cheers,

Thursday, April 19, 2007

Twin exhaust modification

Was at Lao Pi's place again this week and obviously he did something new to his car again. Center twin exhaust modification!!


From the above, you can see that it's not just a cosmetic program. It's the real stuff.


I think the overall workmanship is very good and the styling works well. However, the rear fog lamp seems to take a bit of attention away from the exhaust.

Cheers,

Saturday, March 24, 2007

Bonnet Damper installed

Ok. I've had the bonnet damper for the longest time but never got around to fixing them up. So today, whilst we were at Audio Concepts, Justin helped me fix them up.

This is the black version as I don't quite like the CF type. It's really strong and should be able to take a sound proof bonnet easily.


In total, we drilled 3 holes. 1 was a mistake, but no big deal.


Got the full set up, but still, the bonnet was too light for the damper. It springs up when we lift up the bonnet. Perhaps I'll change a set. Sigh.....

Cheers,

Wednesday, February 28, 2007

Angel eyes for NFL Wish

Seems like the angel eyes for the new face lift will be here soon.

Hopefully, it will look like this version. The bigger ring will be with the parking/pole light and the reflect will help set the light back out. As it is recessed in, the look will be quite neat.

For the projection headlight, the ring will sit in the groove between the protection lens and the chrome headlight cover. There will be no reflector to help throw the light forward. As such, it will not be as bright/impressive as the pre facelift version.


Tempting... so tempting...

Cheers,

Sunday, February 25, 2007

PCD Conversion kit/Spacer

As you all know, the Toyota Wish PCD is 5 X 100. As a result, rim options are limited. However, there is a spacer conversion kit available. This 15 mm spacer will covert the PCD to 5 X 114 and suddenly, there choices for rims are overwhelming!!


However, there are considerations as the tyres may rub against the wheel arch or fenders if it's on an 18 inch set. I think it's best for up to 16 inch set up only.

Cheers,

Tuesday, February 20, 2007

Elusive clear reflector

For those with clear tail light and looking to remove all signs of redness at the rear of the car, there is hope.

Here is the clear reflector together with the red one. In Japan, they are modifiying it to include LED light too.


Cost JPY 9800 per set excluding postage. But it sure looks nice. Bet everyone will be asking where you got it if you have one installed on your ride. Hee Hee.

Cheers,

Wednesday, February 07, 2007

Illuminated Toyota Logo!!

It's already been done in Taiwan before, but here's the Japanese version! Illuminated Toyota logo! For both the front and the back.


When not lit, it looks like any ordinary Toyota logo. The emblem sits on a die cut clear acrylic and the LED and wiring is sandwiched between the logo and the acrylic. Obviously, you can have a choice of white, red or blue.


Available in Japan for about JPY 10000.

This kind of modification looks best on a white Wish. I suppose if you use a red light and tap it to the brake light, it's not illegal as there is no restriction on extra brake lights. Perhaps Sam can consider for another One aNd Only project.

Cheers,

Monday, February 05, 2007

TRD Sports seats

So... now that the brakes are upgraded, what's next?

How about......sports seats!! TRD has options that looks really nice and sporty!!

The design is made in such a way to enhance driving experience, especially during cornering, to prevent body roll. Not the car body, but your body.


It's fabric, but I'm sure we can have it leather wrapped and include the TRD Sports embriodery as well. But as Andrew pointed out, it has no arm rest. Also, Justin mentioned that there's no option for LCD screen at the headrest. What a shame.

So who's game?

Cheers,

Wednesday, January 31, 2007

4 pot front brake upgrade!

Can the fierce can fiercer?

Just look at the pictures and the answer is obvious. This is a JBT 4 pot front brake upgrade with fiery red caliper and sloted rotor.


Obviously, it's on Plot's Swage Line brake hose too. Full stainless steel. Nothing less.


Just look at it! Definitely got biting power!


For those of you know don't know, it's the BOSS' ride. Sigh...perfection is now another step further away from me.

Cheers,

Sunday, January 28, 2007

Rear disc brake conversion III

And after a whole day's work. It's up!! Mine was slightly faster as I didn't have to do the suspension. So it was ready at about 5 pm for a test drive!

Obviously on Andrew's ride, it looked very impressive as he has racing/sporty rims that shows off the conversion very well.


Mine on the other hand, was pretty much all covered up due to the wide spokes blocking the disc brakes from view.


After we refilled the brake fluid, we went for a test drive and tried emergency braking at speeds between 80 to 120 km/h, on both wet and dry tarmac. The effects was good and the car held straight when emergency brakes were applied. The effects of the ABS working on all 4 brake sets could be felt through the brake pedal.


Something of interest to note is that after the conversion, the rear wheel seems to be spaced further out by about 10 mm. Probably due to the additional space of the rotor between the axle and the drum brake. Initially, I was thinking of doing the 15 mm rear wheel spacer like Andrew, but now, it didn't really seem necessary. A bonus!


Finally, I did my tyre rotation and I also decided to do my wheel alignment with Kenny as well since I didn't do it before. He was kind enough to slot me in despite the full schedule. After his diagnosis, he confirmed my suspicion that Alliance Auto did not do any wheel alignment when they installed the TRD Sportivo Set. I can't believe a shop like Alliance Auto can lie about these things. Anyway, correct the left steer and he mentioned that there was inner tyre wear. The wheel alignment only cost me S$40.
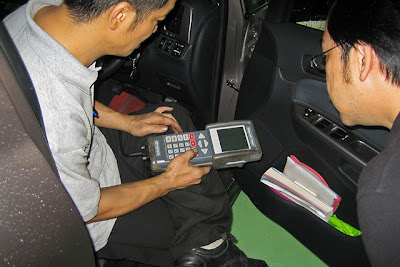


And as for the finishing touch, Riverview did a diagnostic test to confirm that all the wheel sensors are working for the ABS to be effective. My foot brake was also tightened slightly to my prefered level. But this will not be as tight a my previous drum brake setting.

So now, my car is a step closer to the Toyota Wish 1.8 X Aerosports package.


Latest picture today. Actually, it still look very stock as all the recent enhancements are not visible. Oh well...

Cheers,

p.s. Incidentally, Kenny the BOSS also did his rear disc brake conversion with RED calipers yesterday. So now, Ah Lim, Justin, Andrew, Kenny and me are all on original Aerosports rear disc brakes. Allan and Raymond to follow soon. Perhaps we can form another rear disc brake club!

Saturday, January 27, 2007

Rear disc brake conversion II

After analysis, the rear axle is exactly the same as the one we have. As such, the mounting is also similar. So the part that was needed was only the brake assembly mounted on to the axle.


The brakes were removed and the axle was discarded. Kenny from the wheel alignment shop informed me that this axle is not cheap. Sometimes, when folks mounted kerbs or get into accidents, their wheel will be out of alignment when this rear axle is damaged. To replace, it will cost about S$1500. But this item was too bulky for us to keep. So I gave mine to Kenny who also own a black Toyota Wish.


So for the next order, we only need the part that is separated from this bracket onwards. And also the ABS cable and Boot brake cable. Shipping will be much easier then as we won't need the large crate anymore.


The rotor and caliper was cleaned up and mounted. That's the easy part.


The left front passenger chair and the second row left passenger has to be taken out to install the foot brake cable as the original cable connection does not fit. Something to take note of. Good thing the brake set came with the correct cable. Otherwise, everything will stall at this point.


Incidentally, Andrew's TRD sportivo set came with this shipment and he installed it together. Life will never be the same again! Interesting that they have extra rubber pads and hose for spring protection. Alliance Auto (Local TRD agent) does not even have that. In fact, Alliance Auto did not even do any wheel alignment, which is very unprofessional as they lied to me that they did.

More to come.

Cheers,

Friday, January 26, 2007

Rear disc brake conversion I

The day is finally here, after so many delays. We've got 2 sets of rear disc brakes complete with axle shipped in and it's been sitting around waiting to get on our rides. Due to some miscommunication (on my part) the installation was pushed back from Tuesday to Friday.


So, Andrew and I made our way to Riverview for our installation. The parts were already sitting there since Andrew had to haul it there earlier after uncrating it. We got there at about 9 am and our vehicle was hoisted up, getting ready for the big operation.


First, the rear tyres came off and the rear drum brakes mounting were examined before being disassembled. The foot brake line, ABS cable and the brake hose were also scrutinized.


This is what the inside of our drum brake set looks like. The two arched part are the brake pads. As the pads are inside the drum brake cover, most workshops will not check it during servicing. They just advise you to change it every 100,000 km or so. Lazy.


Andrew said that our drum brake looks like a single actuator type. The effective braking for the brake shoe for single actuator type mainly on the top side of the shoe. Although the bottom side is slightly biased inwards, overall the whole of the brake shoe is not fully utlised.

More to come.

Cheers,

Tuesday, January 23, 2007

ATF Cooler installed

Touched down today from Taipei and went straight to install my ATF cooler. It's the customised version from GTBug (Daniel).


Quick installation as I don't have a bodykit. One of the advantages of a stock looking ride. Installation was done at the Ang Mo Kio Multi Story carpark, which was quite a hell to find. But the place was spacious and there was hardly any traffic. Daniel's wife also helped out and that was quite a surprise.


No drilling or hammering and a relatively smooth installation. However, the ATF cooler seems to be slightly crooked. Probably due to the steel braided hoses weighing it down on the right side.

From the above picture, you can also see that there is not much space left for anything else. Oil coolers are usually to big to squeeze into the space on the right. Perhaps an additional cooling fan. We'll see. And look at my lovely stock horns. Should be looking at replacing those too when I have the chance.


As you can see, the new hoses just attach to the original hose and there are proper connectors in place to prevent leakages. There was no top up of ATF fluid for this installation. I was advised that during the next servicing, just tell the mechanic to add 200 ML.


From a distance, it ATF cooler is not really too obvious, even when photographed with flash. If the cooler and the hoses were black in color, it will be a lot more discrete.

Total damage S$250.

Cheers,